Making Ubuntu/Debian Linux do it’s own DNS (Domain Name Service)
Okay so what is dns? Dns is the piece of software that translates the www.usatoday.com into http://209.97.50.34 auto-magically, behind the scenes.
Yeah those ip addresses might be a little hard to remember. Making your Linux box, be it’s own dns, means faster/quicker access to the internet. That’s what we want!
Quick comparison. Using my isp’s supplied nameserver, I did a dig on hak5.org.
;; Query time: 99 msec
;; SERVER: 68.10.16.20#53(68.10.16.20)
;; WHEN: Wed May 25 00:11:57 2011
;; MSG SIZE rcvd: 177
vs my local DNS machine:
;; Query time: 1 msec
;; SERVER: 127.0.0.1#53(127.0.0.1)
;; WHEN: Wed May 25 00:15:19 2011
;; MSG SIZE rcvd: 46
WHOA! 99 msec vs 1 msec. Oh yeah!
While the steps outlined here are easy to follow:
* * * W A R N I N G DANGER WILL ROBINSON! W A R N I N G * * *
THESE STEPS SHOULD ONLY BE UNDERTAKEN IF YOU HAVE AN
ADVANCED KNOWLEDGE (OVER A YEAR) WITH LINUX. THIS IS not
FOR N00BS!
As always, anything with an octothorpe (#) is a comment. That and the comments that follow need NOT be coded.
NOTE that a LAN DNS Server is meant to run on a machine that is always on the Internet. In other words, up 24/7/365. You only need ONE DNS server per LAN. Remember, if you will use this for DNS resolution of any other computers on your LAN, that computer should always be running. If your DNS machine is powered off, DNS will default to the second DNS server in your router, and continue on.
1. do an ifconfig, so we have a path back to the way it was before we messed it up.
ifconfig
You will get output that looks like:
eth0 Link encap:Ethernet HWaddr 00:23:54:12:ec:6c
inet addr:192.168.1.101 Bcast:192.168.1.255 Mask:255.255.255.0
inet6 addr: fe80::223:54ff:fe12:ec6c/64 Scope:Link
UP BROADCAST RUNNING MULTICAST MTU:1500 Metric:1
RX packets:2905 errors:0 dropped:0 overruns:0 frame:0
TX packets:3651 errors:0 dropped:0 overruns:0 carrier:0
collisions:0 txqueuelen:1000
RX bytes:1808387 (1.8 MB) TX bytes:543852 (543.8 KB)
Interrupt:42 Base address:0x6000
2. The second step is to remove the network manager. YUP! I said this
ain’t for n00bs! Go to: System/Adminstration/Synaptic Package Manager
3. Type in network-manager, find network-manager and check MARK FOR COMPLETE REMOVAL. Hit apply. Network mangler is history.
4. Now change from using any dynamic dhcp assignments to a static ip LAN address.
let’s first backup the file:
cd /etc/network

sudo cp interfaces interfaces.bkp     # make a backup copy of the file
using your favourite editor, change /etc/network/interfaces to read:
iface eth0 inet static		# define eth0 as static

address 192.168.1.101		# and the static ip address we want

netmask 255.255.255.0		# the netmask

network 192.168.1.0		# the network

broadcast 192.168.1.255	# broadcast group

gateway 192.168.1.1		# gateway to the internet, is router ip
save and exit.
5. Now we install the dnsmasq software.
sudo apt-get install dnsmasq
6. backup /etc/resolv
cd /etc/

sudo cp /resolv.conf resolv.conf.bkp     # make a backup copy of file
edit /etc/resolv.conf using your favourite editor, it should look SOMETHING like this:
domain ph.cox.net               # domain name of your isp

search ph.cox.net                # search doman name

nameserver 127.0.0.1          # first name server is the local machine

nameserver 68.10.16.20       # primary dns server (from isp)

nameserver 68.10.16.29       # secondary dns server (from isp)
7. Now let’s test our new configuration. Dig is a dns lookup utility
dig www.hak5.org
and you will get something that looks like:
; < <>> DiG 9.7.1-P2 < <>> www.hak5.org

;; global options: +cmd

;; Got answer:

;; ->>HEADER< <- opcode: QUERY, status: NOERROR, id: 17839
;; flags: qr rd ra; QUERY: 1, ANSWER: 1, AUTHORITY: 0, ADDITIONAL: 0

;; QUESTION SECTION:
;www.hak5.org.			IN	A

;; ANSWER SECTION:
www.hak5.org.		63	IN	A	50.19.115.126

;; Query time: 0 msec
;; SERVER: 127.0.0.1#53(127.0.0.1)
;; WHEN: Tue May 24 19:59:55 2011
;; MSG SIZE  rcvd: 46
The item to notice is: ;; SERVER: 127.0.0.1#53(127.0.0.1
that tells us the name of the DNS server it used. Yup that's our guy!
8. But what happens if I need to change the settings for my card or....some other thing?
no fear!
wicd is a very nice replacement for network mangler.
sudo apt-get install wicd
to run:
sudo wicd-client
Enjoy your own DNS goodness.
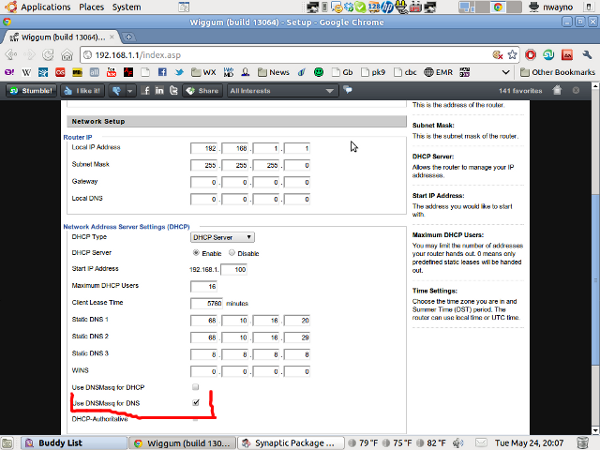
You may need to adjust some router settings. I am running dd-wrt and so I had to do check use dnsmasq for DNS so that the 127.0.0.1 would show up in /etc/resolv.conf properly.
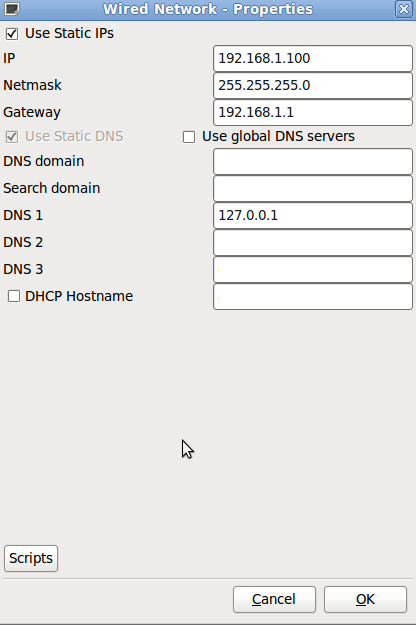
You may need to go into wicd properties for the ethernet card, and add 127.0.0.1 as the first static dns server, then add your isp as dns 2 and 3 (or you can use google’s dns servers: 8.8.8.8 and 8.8.8.4:
And anything on your LAN would also be able to use this for a DNS server. Just point it to the LAN address of where you installed the software. In my case: 192.168.1.101. You would also need to port forward all incoming dns requests in your router for port 53 to the LAN ip of your dns server.
==========
Here is a test using my Netbook:
I changed /etc/resolv.conf on my Netbook (this is temporary, since network mangler is installed on my Netbook)
nwayno@Nelson:/etc$ cat /etc/resolv.conf
# Generated by NetworkManager
domain ph.cox.net
search ph.cox.net
nameserver 192.168.1.101
nameserver 68.10.16.20
nameserver 68.10.16.29
nameserver 8.8.8.8
nwayno@Nelson:/etc$
I changed the nameserver to point to the dns server we just created.
Now dig:
nwayno@Nelson:/etc$ dig www.hak5.org
; < <>> DiG 9.7.1-P2 < <>> www.hak5.org
;; global options: +cmd
;; Got answer:
;; ->>HEADER< <- opcode: QUERY, status: NOERROR, id: 16789
;; flags: qr rd ra; QUERY: 1, ANSWER: 1, AUTHORITY: 0, ADDITIONAL: 0
;; QUESTION SECTION:
;www.hak5.org. IN A
;; ANSWER SECTION:
www.hak5.org. 129 IN A 50.19.115.126
;; Query time: 2 msec
;; SERVER: 192.168.1.101#53(192.168.1.101)
;; WHEN: Tue May 24 23:30:00 2011
;; MSG SIZE rcvd: 46
nwayno@Nelson:/etc$
Notice that the server address is indeed: 192.168.1.101 -- Our new DNS server.
9. Be brave and get rid of the network-mangler once you know all is well:
sudo apt-get purge network-manager
CAUTION: DO THIS ONLY IF WICD IS WORKING CORRECTLY. IF YOU DO THIS AND WICD FAILS, YOU WILL INDEED HAVE NO INTERNET CONNECTION. YOU WOULD HAVE TO GO TO ANOTHER MACHINE AND GET THE .deb FILES.
Thanks Joe and Loni, for your help.


