How to add a printer in Ubuntu/Debian Linux
Okay, by now you know that if I am asked the same question more then once in a week, the answer will end up here.
It’s fairly straight forward, but there’s a couple things you might want to do. Even if you have successfully added your printer and it works, you might find out a thing or two. This is something I learned after replacing my colour cartridge twice in a month when I first started with Linux 6 years ago. This is especially true of older HP (hplip) Printers!
First though, let’s add that printer!
1. System/Administration/Printing
2. Press the Add button, then forward.
It will say: “Searching for Drivers” — it might take a minute or so.
Give it a name — let’s call this one: BLACK
you will see WHY in a few minutes. Click on apply, and the printer should be added.
By default, Ubuntu adds the printer as a colour printer. And everything works great. BUT, what’s happening is that it really is using your colour cartridge to make the black ink. Expensive! So how do we fix that?
NOTE: (If the printer works, then just right click on the printer, and highlight duplicate, and give it the name BLACK)
3. Right click on the Printer (BLACK), and then left click on properties.
4. Left click on Printer Options.
5. For output mode, I chose: Black only Grayscale.
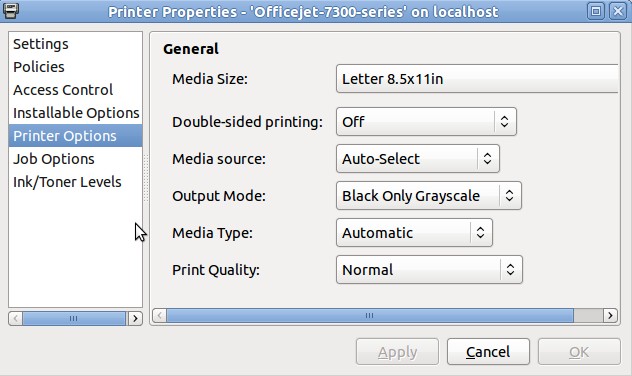
6. Click on Apply and okay.
7. Right click on the printer, and left click on “Set as Default”
The printer will now use the black cartidge to print, instead of using the colour cartridge to make black ink.
So how do you print colour? Easy. Go to print, and select the original printer. I renamed mine to Photos.
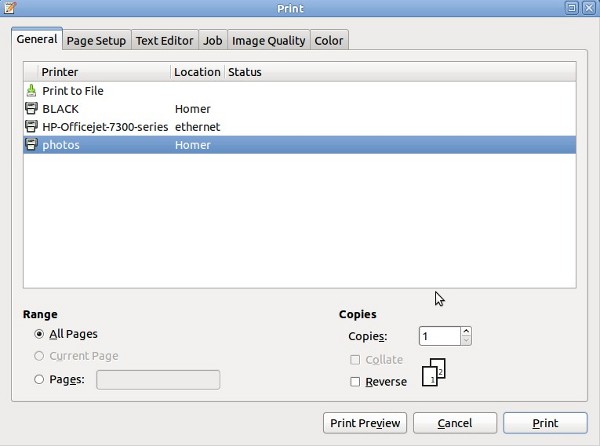
So you have 2 LOGICAL printers now, instead of just one. One for black and white, and one for colour.
Save some money!
🙂
Wayno

Related Articles
No user responded in this post